As a photographer, when working with colour in your photo editing, it is a must that your monitor is calibrated correctly. That way, you know the colours you're seeing are correct.
If you are working with an uncalibrated monitor, chances are you are wasting oceans of time on your photo editing without your colours being correct.
Once you've finished editing your images and want them printed, your monitor and printer will never match and you'll end up wasting lots of time and on re-printing your images.
Most often the printer is blamed, but we often see the screen as the problem.
Although colour management for photographers can be done easily with the right tools, many still don't spend the time.
Many photographers spend a lot of money on good cameras and printers, but forget something as fundamental as their colour management.
We usually say that all photographers should at least use a screen calibrator such as i1Display Pro and a ColorChecker Passport Photo for colour management.
If you also have a printer, you might also want to look at a printer calibrator.
Here is a list of screen calibrators that can be used from both X-Rite and Datacolor.
Some of them can even calibrate both your printer and monitor.
X-Rite
-
X-Rite i1Display Pro
-X-Rite Colormunki Display
-
X-Rite Colormunki Photo - screen and printer calibration
-
X-Rite i1 Basic Pro
-
X-Rite i1 Photo Pro - screen and printer calibration
-
X-Rite i1 Publish Pro - screen and printer calibration
Datacolor
-
Datacolor Spyder5 Elite
-
Datacolor Spyder5 Pro
-
Datacolor Spyder5STUDIO - screen and printer calibration
We have created this guide, which shows you how to do your standard screen calibration correctly.
You can use both Spyder and X-Rite screen calibrators for this guide.
The software varies slightly, but the settings are the same.
Before we begin, we need to do a few things on the computer.
- Turn on your monitor for min. 30 so it can warm up properly.
- Reset your screen settings - done on many monitors by pressing factory reset.
- Make sure you have closed any programs that might interfere with calibration, such as screen savers, email and programs with pop-ups.
If you are doing screen calibration on a Mac, you will need to set up your settings correctly.
This is done here.
System Preferences:
- In Displays, turn off Auto-Brightness-Adjustment.
- In Universal Access, set the Contrast Slider to Normal (left position).
- In Desktop & Appearance, turn off the Translucent Menu Bar option.
- In Energy, turn off the Energy Saving options for Laptop Displays.
There yougo!
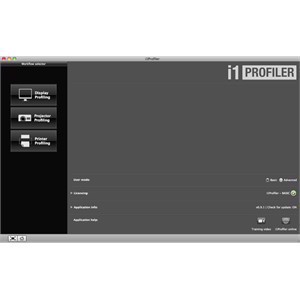
Step 1 - Launch the profiling software
Connect your monitor calibrator to your computer and launch the calibration software. In this case, we're doing it with a X-Rite i1Display Pro and the included i1Profiler software.
Select
"Basic"
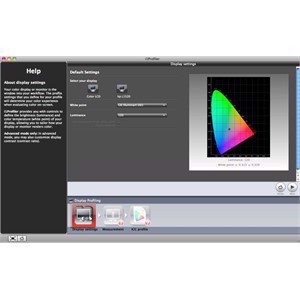
Step 2 - Select Monitor
Select the monitor you want to calibrate.
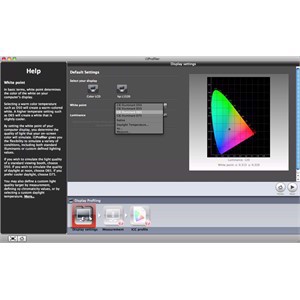
Step 3 - Set White Point
Select your white point
"White Point"
Once is photographer, then you need to select D65. The D65 is what most people should choose when working in photography and graphic design.
It provides the easiest match between printer and monitor.
D50 is used when doing print jobs at a print shop, as D50 is the standard for assessing color in the graphic arts industry.
Step 4 - Set your Brightness
Choose your Brightness
"Luminance"
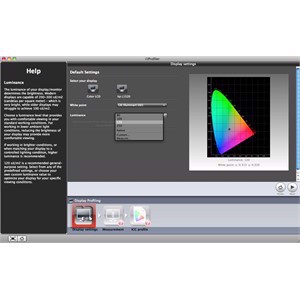
We recommend 120, which should be bright enough to assess both color and contrast, but if you have trouble seeing it, choose a lower value that can go down to 100.
Step 5 - Start calibration
Calibrate your screen calibrator by pressing the
"Calibrate" button.
Step 6 - Adjust the brightness of the screen
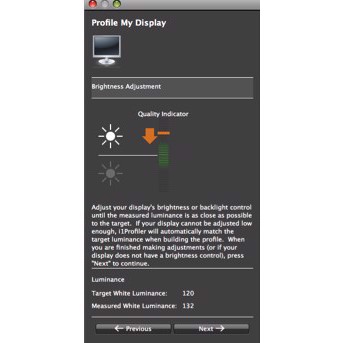
Now we need to start the calibration by first adjusting the brightness to the desired setting.
Click
"Next" and let the software make a measurement.
You can now see if your screen is too bright or dark compared to the desired brightness.
This is illustrated on the right and you then need to manually turn the brightness up or down.
The orange bar should be in the middle and a green check mark will appear.
Now you can click the
"Next" button
Step 7 - Measure Colors
Let your monitor calibrator start the color measurement.
At this point, don't do anything except wait, so have a cup of coffee while you wait.
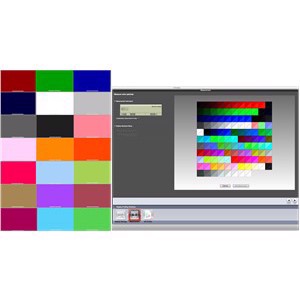
When your screen calibration is complete, you will see this screen on the right and you can click
"Next".
Step 8 - Save Screen ICC Profile
Now we are actually done and you just need to name your ICC profile and save it.

See your delivery time
 Fast ShippingFast shipping from Denmark
 +45 70 60 80 43Mon-Fri 09-15:00
 Professional ServiceYou get professional knowledge about all our products
 4+ Star ReviewsOur customers give us 4+ reviews
 +45 70 60 80 43
Mon-Fri 09-15:00
+45 70 60 80 43
Mon-Fri 09-15:00